Tuesday, June 13, 2017

Talend Data Migration Tool

Start from Creating a Project see screen below

Create job now


From the component choose Databases and Mysql
Then Drag tMysqlInput and Drop in job design area.
Click on it and enter mysql connection in Component section and write query for the data which you want to dump into target database.

Then Drag tMysqlOutput and Drop in job design area.
Click on it and enter mysql connection in Component section.

From the component choose Processing and Drag tMap and Drop in job design area.
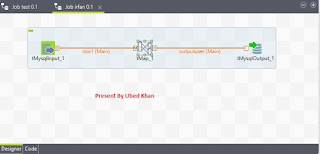
Then Map tMysqlInput to tMap and tMap to tMysqlOutput
To map you have to right click on tMysqlInput->row->main  then right click on tMap->row->Newoutput


Now double click on Map new mapping screen will open where you have to drag column from left to right side.
left one is your source table and right one is your target table.
see screen


Now go and run your created job that's it.
see screen


Read More »

Thursday, May 25, 2017

Basic layout of Dompdf

<html>
<head>
  <style>
  @page { margin: 50px; }
.header,
.footer {
    width: 100%;
    position: fixed;
}
.header {
    top: -50px;
    height:50px;
}
.footer {
    bottom: -50px;
    height:50px;
}
.pagenum:before {
    content: counter(page);
}
  </style>
  </head>
<body>
<div class="header">
    <div style="border-bottom:1px solid #ccc000;">Ubed Khan Web Developer&#0169;</div>
</div>
<div class="footer">
    <div style="border-bottom:1px solid #ccc000;">Copyright &#0169; 2017 ukphpdeveloper.blobspot.in. All Right Reserved.</div>
</div>
<div class="content">
//here your pdf page content will placed
you can use page break style as below when you want your content on next page of pdf.
 <!--<p style="page-break-before: always;"><a href="ukphpdeveloper.blogspot.in">ukphpdeveloper.blogspot.in</a></p>-->
</div>
</body>
</html>

Dompdf with cakephp

Read More »

Wednesday, May 24, 2017

Cakephp and Dompdf

Here we go

Download dompdf library
https://github.com/dompdf/dompdf/releases/tag/v0.6.1
Extract zip file and rename dompdf and keep dompdf folder in app/vendor directory

open app/config/routes.php and place following line in it

Router::parseExtensions('pdf');

Now create pdf directory in app/view/layouts
then create default.ctp file in app/view/layouts/pdf/ and paste following code in it

<?php
require_once(APP . 'Vendor' . DS . 'dompdf' . DS . 'dompdf_config.inc.php');

// instantiate and use the dompdf class
$dompdf = new Dompdf();

$dompdf->load_html($content_for_layout);

// (Optional) Setup the paper size and orientation
$dompdf->set_paper('A4', 'landscape');

// Render the HTML as PDF
$dompdf->render();

// Output the generated PDF to Browser
$dompdf->stream();
exit(0);

Now open any controller , assume here PostController.php

Create function as below for pdf link
function pdflink(){
}

Create view file in app/view/posts directory and name it pdflink.ctp and paste following code
<?php
echo $this->Html->link(__('PDF'), array('action' => 'view_pdf', 'ext' => 'pdf', 1));
?>

Create following function to view pdf data
function view_pdf(){
}
Now create "pdf" directory in app/view/posts directory.
Then Create view file in app/view/posts/pdf/ directory and name it "view_pdf.ctp" and paste following html which will display in your pdf.
<h1>Ubed Khan Web Developer</h1>
<p>Thanks to visit ukphpdeveloper.blogspot.in</p>

Now Run
http://localhost/project-name/posts/pdflink
you will see the link on this page and just click on that your pdf will download. It's simple as that.


Note: Keep your debug mode on production level in app/config/core.php
Configure::write('debug',0);

if you will get the error that font.php file not found then you have to download php font from below link
https://github.com/PhenX/php-font-lib/releases
or
https://github.com/PhenX/php-font-lib/tree/master/src/FontLib

And create "classes" directory in app/Vendor/dompdf/lib/php-font-lib/
Then paste downloaded php font library in app/Vendor/dompdf/lib/php-font-lib/classes/

if you large amount of data then it will need execution time more than 30sec which is by default in php.ini file. so you can try by doing following changes.

ini_set('memory_limit', '512M');
ini_set ( 'max_execution_time', 2400);

Enjoy coding ;)

Basic layout of Dompdf

Read More »

Tuesday, April 11, 2017

Upload file from ckeditor in cakephp

To upload file from ckeditor you just have to use following four step and that's done.

Include Ckeditor library file
<?php echo $this->Html->script('/js/ckeditor/ckeditor');?>

Textarea with class ckeditor
<?php echo $this->Form->textarea('StaticPage.page_content',array('class'=>'ckeditor'));?>


<script type="text/javascript">
    CKEDITOR.replace( 'data[StaticPage][page_content]',
    {
        //filebrowserBrowseUrl :'/js/ckeditor/filemanager/browser/default/browser.html?Connector=/js/ckeditor/filemanager/connectors/php/connector.php',
        filebrowserImageBrowseUrl : '/js/ckeditor/filemanager/browser/default/browser.html?Type=Image&Connector=/js/ckeditor/filemanager/connectors/php/connector.php',
        //filebrowserFlashBrowseUrl :'/js/ckeditor/filemanager/browser/default/browser.html?Type=Flash&Connector=/js/ckeditor/filemanager/connectors/php/connector.php',
        //filebrowserUploadUrl  :'/js/ckeditor/filemanager/connectors/php/upload.php?Type=File',
        //filebrowserImageUploadUrl : '/js/ckeditor/filemanager/connectors/php/upload.php?Type=Image',
        //filebrowserFlashUploadUrl : '/js/ckeditor/filemanager/connectors/php/upload.php?Type=Flash'
    });
</script>


Keep following php file in app/webroot

<?php
$url = 'img/uploads/'.time()."_".$_FILES['upload']['name'];

 //extensive suitability check before doing anything with the file…
    if (($_FILES['upload'] == "none") OR (empty($_FILES['upload']['name'])) )
    {
       $message = "No file uploaded.";
    }
    else if ($_FILES['upload']["size"] == 0)
    {
       $message = "The file is of zero length.";
    }
    else if (($_FILES['upload']["type"] != "image/pjpeg") AND ($_FILES['upload']["type"] != "image/jpeg") AND ($_FILES['upload']["type"] != "image/png"))
    {
       $message = "The image must be in either JPG or PNG format. Please upload a JPG or PNG instead.";
    }
    else if (!is_uploaded_file($_FILES['upload']["tmp_name"]))
    {
       $message = "You may be attempting to hack our server. We're on to you; expect a knock on the door sometime soon.";
    }
    else {
      $message = "";
      $move = @ move_uploaded_file($_FILES['upload']['tmp_name'], $url);
      if(!$move)
      {
         $message = "Error moving uploaded file. Check the script is granted Read/Write/Modify permissions.";
      }
        if ($_SERVER['SERVER_ADDR'] == "172.10.1.7" || $_SERVER['SERVER_ADDR'] == "192.155.246.146")
            $url = "http://".$_SERVER['SERVER_ADDR'].":".$_SERVER['SERVER_PORT']."/" . $url;
        else
            $url = "http://".$_SERVER['SERVER_ADDR']."/" . $url;
     
    }
$funcNum = $_GET['CKEditorFuncNum'] ;
echo "<script type='text/javascript'>window.parent.CKEDITOR.tools.callFunction($funcNum, '$url', '$message');</script>";
?>


Do setting of php file in ckeditor config it will be in app/webroot/js/ckeditor/config.js

CKEDITOR.editorConfig = function( config ) {
// Define changes to default configuration here. For example:
// config.language = 'fr';
// config.uiColor = '#AADC6E';
         config.filebrowserUploadUrl = '../../../ckupload.php';
};


Read More »

Monday, January 18, 2016

How to install Symfony

1) run following command
php -r "file_put_contents('symfony', file_get_contents('https://symfony.com/installer'));"

2) run following command
symfony new my_project 2.8

3) see picture below


4) Run on web


In php ini open this extension
extension=php_intl.dll

Note: if you not installed Php accelerator, please install by following steps

  1. to show you PHP configuration via the PHP function phpinfo() ;
  2. to get 2 precious informations :


x86 or x64, and TS (Thread Safe) or NTS (Non Thread Safe) ;
3.to download the corresponding DLL there (including your PHP version) http://pecl.php.net/package/APCu/4.0.6/windows


4. to copy/paste the DLL file within your extensions directory,
5. to edit your php.ini file (i.e. within C:xampp/php directory) ;
and add this line inside Dynamic Extensions part :
;;;;;;;;;;;;;;;;;;;;;;
; Dynamic Extensions ;
;;;;;;;;;;;;;;;;;;;;;;

[...]

extension=php_apcu.dll

Don't forget to restart server.


Read More »

Tuesday, January 5, 2016

Cakephp validate

we can do validation with Model in cakephp by  array variable  i.e  $validate.

here you can see working validation example which you have to write in model

public $validate = array(
            'username' => array(
                'notBlank' => array(
                    'rule' => array('notBlank'),
                    'message' => "Please enter username",
                ),
            ),
            'password' => array(
                'notBlank' => array(
                    'rule' => array('notBlank'),
                    'on' => 'create',
                    'message' => "Please enter password",
                ),
            ),
            'email' => array(
                'notBlank' => array(
                    'rule' => array('notBlank'),
                    'message' => "Please enter email",
                ),
                'email' => array(
                    'rule' => array('email'),
                    'message' => "Please enter valid email",
                ),
               'isUnique' => array(
                    'rule' => 'isUnique',
                    'message' => 'Email already registered'
               ),
            )
        );

you can also validate in controller  see below code snippet

if ($this->User->validates()) {
     // do whatever you want after all fields beings validated
}else{
     $this->set('data', $this->request->data);
     $this->validateErrors($this->Sendmail);
     $this->render();
}


suppose you have two submit  button in one form  like Btn1  and Btn2
On click of Btn1 you want to validate some fields and on click of Btn2 you want to validate all fields
Then you can have more than one validates array and select which one you want to use before you save

see below code snippet for model

public $validate = array(
   // default validation rules
);

public $validateforallfields = array(
   // validation rules including password validation
);


Now, in your controller action you can select to validate with the all fields with:

$this->User->validate = $this->User->validateforallfields;


Thanks to watch :)


Read More »

Saturday, October 17, 2015

Sorting multidimensional array

//Input
$files = Array
(
    

    [0] => Array
        (
            [filename] => 1.mp4
            [modified] => 0.00
        )

    [1] => Array
        (
            [filename] => video2
            [modified] => 1.00
        )

    [2] => Array
        (
            [filename] => video1
            [modified] => 2.00
        )

)

usort($files, array('UsersController','date_compare'));

$files is your multidimensional array
UsersController is your class name
date_compare is function

function date_compare($a, $b){
        $t1 = strtotime($a['modified']);
        $t2 = strtotime($b['modified']);
        return $t2 - $t1;
    }

Output
Array
(
    

    [0] => Array
        (
            [filename] => video1

            [modified] => 2.00
        )

    [1] => Array
        (
            [filename] => video2
            [modified] => 1.00
        )

    [2] => Array
        (
            [filename] => 1.mp4
            [modified] => 0.00
        )

)
Read More »